Are you interested in implementing HTTP security headers on your WordPress website?
HTTP security headers serve as an effective way to fortify the security of your WordPress site, providing a valuable shield against potential threats that can hamper your site’s performance.
In this introductory guide, we’ll walk you through the process of incorporating HTTP security headers into your WordPress platform.
What Are HTTP Security Headers?
HTTP security headers are like protective shields for your website. They work by stopping common security problems before they can harm your site.
When someone comes to your WordPress site, your server sends a message to their web browser. This message talks about errors, how long to keep things saved, and other important stuff.
Normally, the message says “everything’s okay” with a code called HTTP 200. Then your website shows up on the person’s screen. But if something’s wrong, the server sends a different message.
For example, it might say there’s a big problem with a 500 error or that it can’t find the page with a 404 error.
HTTP security headers are like a special part of these messages. They’re here to protect your website from common problems like trickery, sneaky code, and strong attacks.
Now, let’s take a brief peek at a few HTTP security headers and what they do to keep your website safe:
- Content-Security-Policy (CSP): Think of CSP as your website’s security guard. It sets rules for what types of content can be loaded on your site. By defining these rules, it helps prevent malicious scripts and attacks from harming your website.
- Strict-Transport-Security (HSTS): HSTS is like a “secure only” sign for your website. It tells web browsers to always use the secure HTTPS protocol when connecting to your site, reducing the risk of data interception.
- X-Frame-Options: This header puts up a barrier against click-jacking and cross-domain iframes. It tells browsers whether your site should be allowed to load inside a frame on another site.
- X-Content-Type-Options: Imagine this as a label on your content’s box. It declares the content’s type and prevents browsers from trying to guess it. This helps prevent certain types of attacks that rely on mistaken content types.
- Referrer-Policy: This header controls what information your website shares about its visitors. It decides what details are sent to other websites when someone clicks a link on your site. It’s like choosing what information you want to reveal to others.
- Permissions-Policy: Permissions-Policy sets the rules for what your website can access on a user’s device. It’s like telling your website which rooms it’s allowed to enter in a user’s house (their device). This helps protect user privacy and security.
Adding HTTP Security Headers in WordPress via .htaccess
This method lets you set up HTTP security headers in WordPress right at the server level. Here’s how to do it:
- Backup Your Website: Before making any changes to your website files, it’s smart to create a backup. This way, you can easily revert if anything goes wrong.
- Access Your Website Files: Connect to your website using an FTP client or the file manager in your hosting control panel. You’ll want to locate the .htaccess file in the root folder of your website.
- Edit the .htaccess File: Open the .htaccess file using a plain text editor. You’ll find this at the bottom of the file, and it’s where you can add the code to enhance your WordPress website’s security.
- Add the Code: You can start with the following sample code, which sets up commonly used HTTP security headers with good settings:
<ifModule mod_headers.c>
Header set Strict-Transport-Security "max-age=31536000" env=HTTPS
Header set X-XSS-Protection "1; mode=block"
Header set X-Content-Type-Options nosniff
Header set X-Frame-Options DENY
Header set Referrer-Policy: no-referrer-when-downgrade
</ifModule>
- Save Your Changes: Don’t forget to save the changes you’ve made to the .htaccess file.
- Test Your Website: After saving, visit your website to ensure everything works as expected.
Note: Be cautious when editing your website’s code. Mistakes or conflicts in the .htaccess file could trigger a 500 Internal Server Error.
Verifying HTTP Security Headers for Your Website
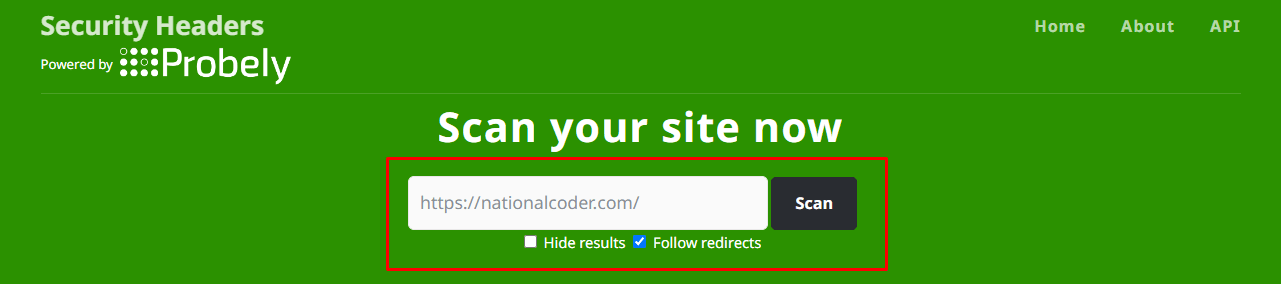
After implementing HTTP security headers on your website, it’s important to ensure they are configured correctly. You can use the free Security Headers tool for this purpose:
- Begin by accessing the Security Headers tool.
- Provide your website’s URL within the tool.
- Trigger the scanning process by clicking the ‘Scan’ button.
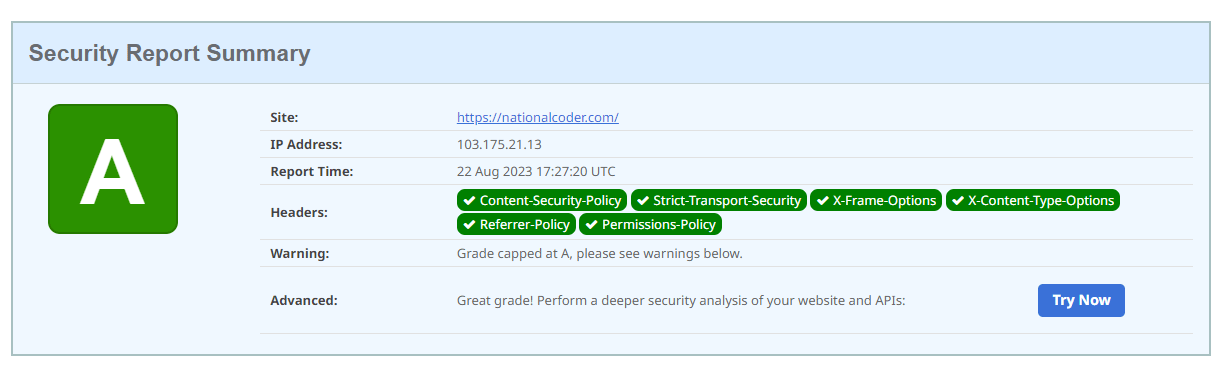
The tool will assess your website’s HTTP security headers and provide a comprehensive report. Keep in mind that the grade label’s significance is limited; most websites typically receive a B or C score without impacting user experience.
Review the report to identify which HTTP security headers your website is sending and whether any are absent. If the intended security headers are present, your setup is deemed successful.
By following these steps, you can verify the functionality of your HTTP security headers. We trust this guide proves valuable. For additional insights into WordPress security, consider exploring our comprehensive WordPress security guide and our expert recommendations for the best WordPress plugins for business websites.
“If you have any questions or require professional assistance, please feel free to comment, or you can reach out to us via Direct message for expert support.”